Monday, November 23, 2015

November Update

We finally decided to cover our ferrocement roof with anahaw palm leaves to absorb the heat from the sun. Our roof absorbs so much heat due to the El Nino that we feel like we are inside an oven sometimes. With the one layer anahaw leaves covering the entire roof and a temporary tarp covering the skylight because the polycarbonate started to leak a bit, the temperature indoors dropped nicely. Now we no longer feel much of the heat. We spent about thirty-five hundred php for the anahaw and nylon ropes to tie them up. A good price for something that keeps us cool all day. We recycled the old netting we had that covered the old thatch roof. This job took only less than fourteen days. Btw even with the tarp covering the skylight, we can still get a bit of light but not too much to heat up the inside.


Monday, September 21, 2015

Update

It has been almost 2 months since the last post. We have been concentrating on planting a variety of plants for cover storey, mid-level storey, bushes, ground covers. We ty to pick plants that are native, non-hybrid, plants that were thought to be weeds but in fact are very precious like the amaranth or locally called kudyapa. We planted a lot of pineapples, local bananas, taro, native coffee, and kudyapa. The plants we recently bought from the plant sale in town are all thriving. Thanks to the ITCZ or intercovergence zone which brings local rains almost everyday.

Our ferrocement roof is holding really well. Although when the temp goes up we definitely feel it inside. It is like we are inside a tagine with small vents. Thankfully we get nice, cool breezes.  The El Niño has definitely made the heat even more unbearable during the peak hours. At least the rains cool the roof off pretty quickly.

Wednesday, July 29, 2015

Update

My parents came for a weeks' visit to celebrate my and my mom's birthdays. We invited our cousin and his family over for lunch on the 18th. His birthday and his youngest daughter's were sandwiched between mine and my mom's so it was just fitting to have a birthdays celebration together. I prepared a Hawaiian feast of Kalua Pork and Cabbage, Chicken Long Rice, and Haupia for dessert. I managed to cook the kalua pork on my trusted pressure cooker, cutting the cooking time into half.  It was a great success. 😊

Anyway, we have been busy planting and replanting all over the property. Thankfully, some rains poured whenever we did some transplanting, which made all the trees happy. ☺

My mom lalso planted a lot of seeds to germinate. Hopefully they will all grow. We will find out soon enough.

Tuesday, July 7, 2015

House renovations done...farm work resumes

Here is the 2nd load of plants on the elf truck.
The week we finished our floor repainting we got hold of a family friend who promised us 10 Golden Tree (my favorite tree in Maui, the one with bright yellow flowers) seedlings. The original seeds did come from Hawaii about 50 years ago. Our friend was gifted some of the seedlings from the parent seeds which she managed to multiply.

We scheduled to pick up the Golden trees on a Thursday. We brought one of our workers to help carry the pots. To our surprise we got more than what we expected. We got 22 Golden tree seedlings, lots of assorted Heliconias, some black bamboo, yellow bamboo, brazil nut seedlings, Fox tail palms, McArthur palms and many more. We thought that was it. Well, it wasn't!

Our friend has this adjacent lot to her house which is filled with an assortment of plants. She needed all of the plants gone so she can level the land and ready it for lease. This meant we had first pick at any plants we wanted for FREE! Wow! So much abundance! So we picked and picked until we loaded our truck bed full of plants 9 times, and an additional 14foot Elf truck 2 times. Now you can imagine how much we got! LOTS!

We even uprooted some of the bigger trees like the Ficus and a few Banyan! Score!

So now we are busy replanting them in our property. I just can't wait to see all those Golden trees bloom.


 We also got these lovely, delicously creamy avocadoes from her tree!


Sunday, June 28, 2015

Video

You can now view the video of our finished projects. Here is a link to our video: http://youtu.be/CNXapAM-rXk Thanks for watching!


Wednesday, June 17, 2015

Floor back job

I mentioned in our previous post that we needed to redo our floor because the paint started to peel off after only less than a year. Turns out the paint used was latex and not the epoxy paint with hardener. Because the bedroom was completely emptied out we took this opportunity to do the floor correctly. We got the right epoxy paint with hardener this time. The old latex paint was easy to remove so after a day of scraping the floor clean we painted the new crimson red floor paint. This took a day, two coats. We then left the floor to cure for 3 whole days. Moved the bedroom furnitures on the 4th day. Now we started scraping off the paint in the living room, thought we just redo the living room floor as well while we're at it. Thought scraping off the old paint would be as easy. We thought wrong. There was a very small portion that was really hard to scrape off, with our substandard scraping tools, ittook us 2 days just to almost completely scrape off all the floor paint. Towards the end of today we just gave up on scraping off everything. At least we managed to scrape off the 2nd coat. Tomorrow we begin repainting the floor. The color will be dark brown like the old paint.

Friday, June 12, 2015

Day 26

On Wednesday, June 11, we have completed our ceiling renovations. It was the 26th working day. Add this to the 75 working days of the roof renovations, we actually worked 101days for both. About 1/3 of the year. We added red primer paint to the compression ring and the rebars holding the bamboo posts on the bond beam to keep it from rusting. Then we installed the polycarbonate sheet that sits right on the compression ring tubes. The scaffolding came down next. While our bedroom is empty of furniture we decided to repaint the floor. This will take 2 to 3 days to cure so we will just have to wait longer before we could move back into the bedroom.

We plan to cement the floor of our tool shed to keep vermin out. Down the line we plan to ferrocement the walls to further protect the shed.

I promised pictures , unfortunately my tablet has been diagnosed with a motherboard problem which, without receipt, will cost 80% of the purchase price. We, therefore, decided to just find a new and more reliable tablet. Thankfully, I was able to retrieve all the pictures before it finally died. Turns out most of the stuff here have a very short shelf life. :(

Anyway,  will post the pictures the soonest possible. Thanks.

Sunday, June 7, 2015

Days 14 to 23

I owe you almost 2 weeks worth of updates. My tablet had to be sent to NCR to get a battery replacement, it will take 2 to 3 months before it returns to me. So I have to use DH's tablet. The downside is posting pics using his tablet takes so long. It is just wasting our wifi time. Anyway, you can just use your imagination after seeing some of the pictures I have taken in the past posts.

So after the 12th panel, in the kitchen area, was finished, we decided to move the scaffolding counter-clockwise so we could apply a 2nd coat to the previous 9 panels. Next, we set up the scaffolding just outside the bathroom to access the next 5 panels which were completed in a week and a day. On Tuesday this past week we moved the scaffolding inside the room but before we could do that we needed to move the shelf, drawers and bed out. on the weekend I would work on organizing the stuff inside the bedroom and remove them  to our temporary storage outside the patio. By the time we were ready to move the furniture it was easy to do. Now our bedroom is the living room for at least until this coming week. We  were able to completely remove all the mats, sheets, nets and tarps in one day, cemented all apnels the next, appkied bostik and paint the following day. What is left are 2 more panels, the last 2, to be cemented, bostiked and painted. Once that is completed on Monday, we can start working on the bedroom floor as most of the paint have been scraped off.

So in less than a month, we will have completed work inside the house. We are quite excited!!  Anyway, we will try to find a way to post the final pictures on this blog.
Thank you for checking our blog. We appreciate your visits. If you have any questions regarding our experiences thus far, please feel free to make a comment. We will try our best to answer your questions. Mahalo!

Tuesday, May 26, 2015

Days 12 & 13

This week we did not anticipate one worker being absent from work due to illness. At least we still had one worker plus DH to do the Bostik and painting of the 10th, 11th and 12th panels. They finally completed them early this afternoon. We also decided to apply a 2nd coat of the Princess Peach which made the panels look better.  Then they moved the scaffolding counter-clockwise so they can apply 2nd coat to the previous 7 panels.

We noticed that with DH helping out the work seems to have gotten faster.

We hope to start working on the panels above the bathroom this week too.

(My tablet is still out of commission. Looks like we have to go to the city to have it serviced. Tried to upload using DH's tablet but it just took forever. Hope my tablet will be fixed so I can post the pics.)

Saturday, May 23, 2015

Days 10 & 11

(Update on my tablet: It got totally discharged when the lady at the store reset it. Hopefully, it was just a battery problem. Otherwise, we will have to bring it to the service center in the city. :/  Tried to upload pictures using this tablet, not mine, but it took forever. Will post them once I get to charge my tablet.)

Anyway, on Saturday we were able to completely finish 9 panels, cleared 3  panels, and applied cement on almost all 3. One of our worker was absent then so only DH and the other worker set up the scaffolding so they can reach the panel that is above our bedroom closet. That took most of the first half of the day. At least by the 2nd half they managed to cement most of the panels.

Next week, on Monday in particular, we want to completely finish those 3 panels. On Tuesday, one of the workers will be taking half the day off. So we hope to set up the scaffolding by the bathroom before he leaves for the day. We will have to figure this out as the scaffolding is too big to be placed inside the bathroom. Then they can proceed with the removal of the mat/plastic/net/tarp.

We hope we can stick to this schedule so we will be able to complete the project by mid-June.

Wednesday, May 20, 2015

Days 5 - 8

(While I was posting this the other day my tablet decided to terminate itself. I just had it for less than 5 months. It seems that most of the electronics around here do not last long thath is why warranties are not worth it. Anyway, I am just glad we have pictures on this blog coz I doubt if we can retrieve any of them from my tablet.)

This week we have opened up 6 panels, did 3 first. Removed the mats, plastic, net and tarps. Applied the cement, then the Bostik. While waiting for it to dry we then opened up the next 3 panels. Work has speeded up compared to the previous week. We hope to complete all 6 tomorrow. Then we can start opening up the next 3. The reason work speeded up is because DH helped with the cementing and painting. All three of them doing one panel each does make a differenece.

I was going to post a picture of all 9 panels, tshowing the different stages: finished, bostik applied, and cement applied. But the connection is too slow to upload. Will try another time.

Friday, May 15, 2015

Day 4

We started painting on the cementitious waterproofer however we found out that the mix was watery. It was supposed to be thick so you will need to add the appropriate amount of water to it. This time we mixed in a cup of the watewrproofer with 2 cups of water which made it runny. We think that the supplier diluted the mix to sell more of it. We could not return the product since it has been opened and used. There is a "no return" policy for items like this. At least we can still use the remaining mix, just as is without any additional water.

Today we finished waterproofing 2 panels and opened up the 3rd one then applied pure cement on exposed areas. Tomorrow we start painting the 2 panels, maybe even the 3rd one too. So excited to see the result.


Thursday, May 14, 2015

Ceiling Job: Day 1-3

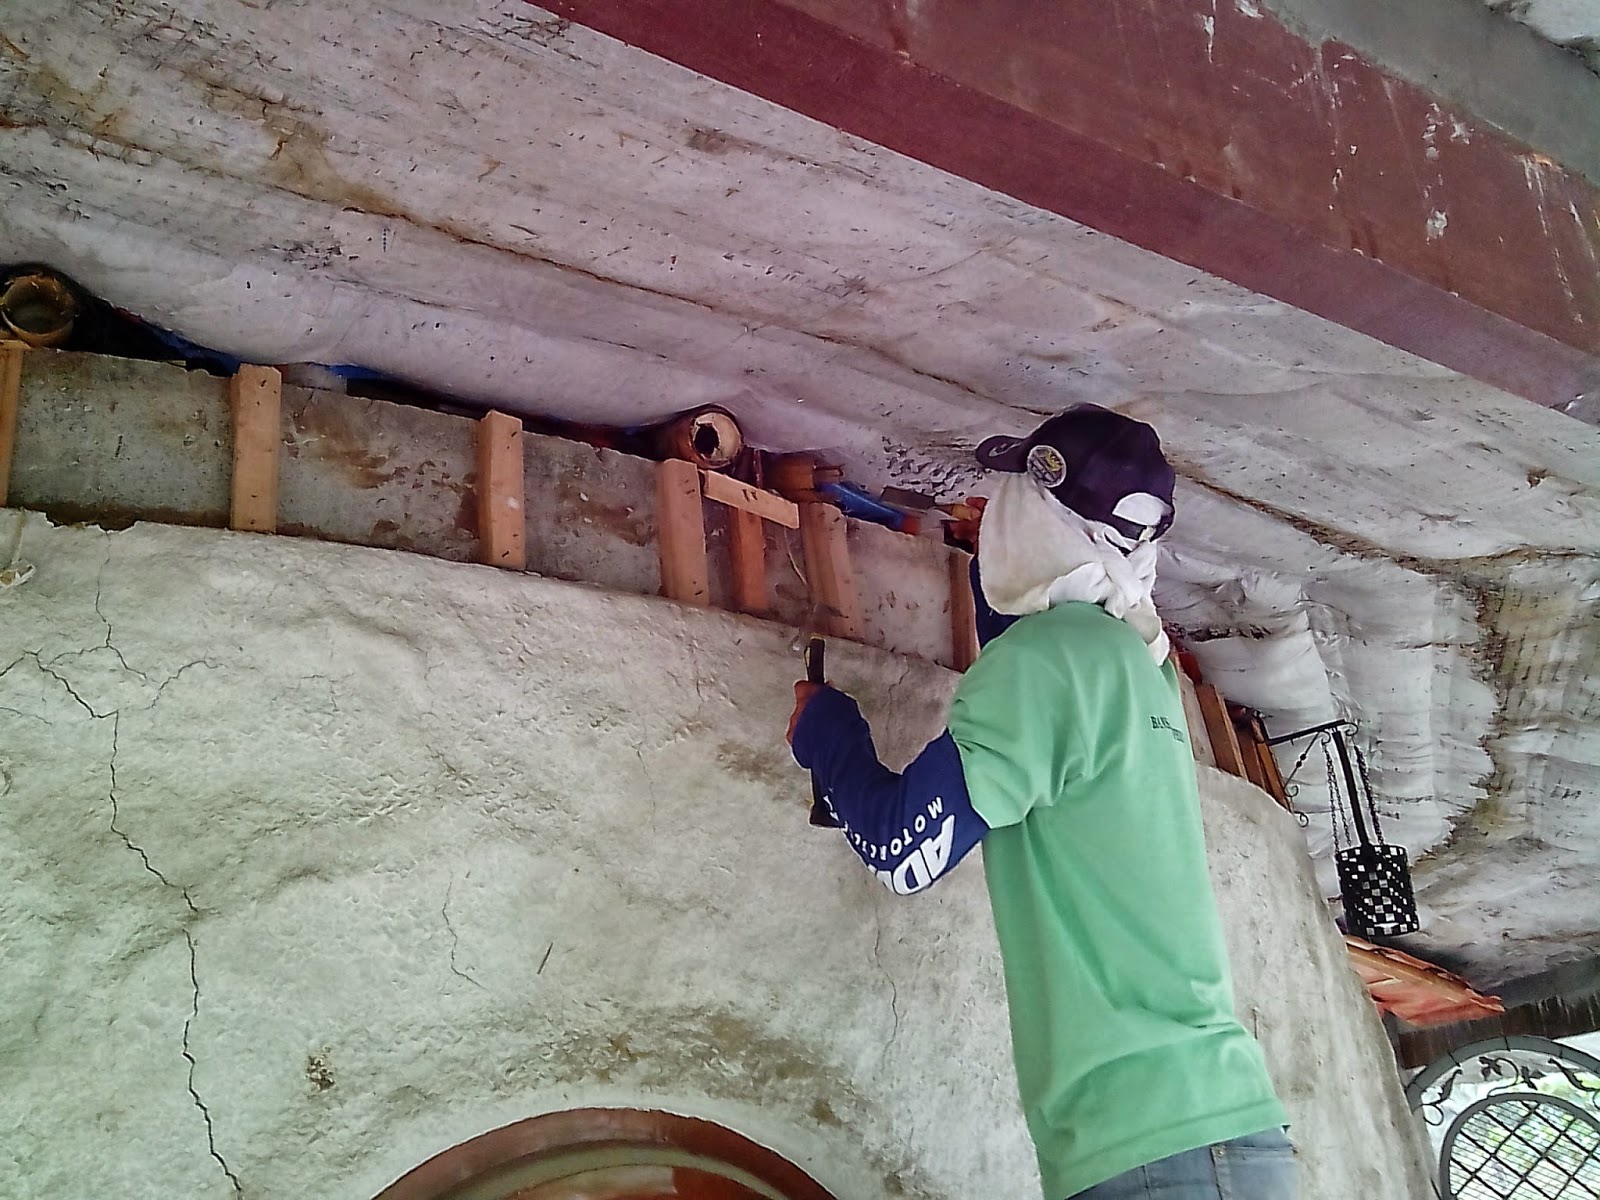
We began opening up the mats on Saturday but did not complete remove the entire panel. Since both our workers needed to complete their specific jobs from the previous week we only started work inside the house on Tuesday after their lunch break. Once the mats, the plastic sheeting, the net and the tarp backing were removed we saw that there were portions where the wire mesh was exposed which we needed to cover with cement. It was not that much, as we have imagined it would be. Also, the top portion, where the mason could only access a small area underneath the stainless steel compression ring, we needed to add about an inch more of cement/sand mix. The rest of the little holes or puck marks were smoothened with pure cement.

Opening up the first mat panel. Checking to see what's up there.
 
Remove the polycarbonate ceiling.   
Removing the tarp backing. 
The top portion with the wires sticking out is now covered with an inch thick cement. 
Look who's doing some work on the ceiling?
 
Two ceiling panels done, started opening up the 3rd one today. 21 more panels to go.

Today, Day 3, we finished cementing two panels and removing the mats on the next panel. We are working clockwise around the house: starting from the south door. This way we get to the room and the bathroom last. We have yet to decide if we should move to our little shack while work is being done, but so far we don't think we need to. We'll find out soon enough.

Tomorrow we will paint on the cementitious waterproofer first then the semi-gloss indoor paint Princess Peach. We also will be painting on red primer on the underside of the compression ring (which is visible inside the house) as well as the rebars that will be exposed once we completely remove all the mats around the bond beam.

Because we have a small area to work with and just one set of scaffolding, we have to do the work a panel at a time, meaning we will complete a panel from cementing to painting, then move on to the next panel. We hope to finish this quickly and easily, with less obstruction to our daily routine. *fingers crossed* :P

Saturday, May 9, 2015

Inside roof work soon to begin

On saturday we have begun setting up our scaffolding inside the house. We plan to work 2 panels at a time as we only have 2 workers and a small space to move around. We will most likely being removing the plastic sheeting and tarp on Tuesday. Instead of doing shotcrete, we will just use pure cement mix and paste it smooth in areas where there are exposed wire mesh. Then paint on the cementitious waterproofer followed by paint.

We were thinking of doing this next year but we realized we needed to make sure these exposed wire mesh will not completely rust, especially when the rainy season is almost upon us - the humidity will surely contribute to it. it is better we do this now.

Thank you for checking in on us. Until the next post...Aloha!

Saturday, May 2, 2015

A week later...

After completing the ferrocement roof project we have started doing some minor landscaping projects around the house. We staarted with opening up the south side, chiseled off the rock wall to give way to a gravel pathway which ends up on the rotunda. This way we have an alternative way to enter the house, a path without steps or stairs. We leveled the dirt about 4 inch deep, put the 1inch aggregate, tamped it, then the small gravel and sand, tamped it.


 Here we have dug out the edge to make a small French drain. This is where the rain water pools after a deluge. We made sure that the soil underneath is slanted to where we want the water to go. After we finished this, the rains poured that night and we saw that this French drain works. Also, opening up that south portion of the wall helps in getting the water to flow out towards the garden, instead of staying inside the wall.

We really wanted to have an open area in the south side of the house but when the rock wall was made we were not there to let them know not to completely encircle the house with a wall. Fortunately, in spite of the bowl-like wall, we did not have any flooding problems inside the house, even with the strong deluge of rain a few times last year.

We are also improving on our canal above the steps, to make sure that it is clear and able to divert any flood coming from above to where we want it.

In the next few months we will be doing some minor landscape work and prepare our land for the coming rainy season. We are very fortunate that in spire of te summer heat, drought forecasted all throughout the country, we have plants that have survived and are producing some fruit like the mansanitas or jamaican cherry, nang duc mai mango and of course our staples: coconuts, bananas and papayas. We are simply grateful to the Universe for abundance all around.

Sunday, April 26, 2015

Day 75 & 76

On Monday we continued painting the mini-beam which connects all the posts. It only took half the day to complete it, with a few touch ups the rest of the day. This is how our house looks like now. Because the roof is so bright we have a hard time focusing the camera on the main house. So all you can see is the bright yellow-green hat roof and the adobe red posts. We also had our worker wax and polish our patio floor which restored the it to its original color.

This is the south facing (main) door. 

Next project will be to clear up the surrounding area, make some pathways near the house and organize/renovate the tool shed. For now, we will focus on preparing the land for the coming rainy season.

Sunday, April 19, 2015

Day 74


First day of painting the posts Adobe Red color. It will probably be finished by this afternoon. We might also paint the mini-bond beam the same color after we chip off the shotcreted cement - it just did not stick and is peeling off in some areas.


This deep red color is quite nice. 

Saturday, April 18, 2015

Day 73

We have given our workers a break to take care of their own personal stuff. It just was great timing that the paintng of the roof was completed. One worker finished shotcreting the portions of the wall which came off when they were taking out the bamboo paneling and removing the tacked tarp which covered our windows.


Anyway, as I previously mentioned, we bought our paint from 3 different stores. It turned out there the ones we bought in the city were more yellow and the one close to our place is more green. You could actually see the difference up close where the top half of the roof is more yellow and the bottom half is more green.


We also had some fog on Friday morning, much to our surprise :-) 


Monday, April 13, 2015

Day 67 & 68

Day 1 of painting covered the top level with about 2 layers of paint and the 2nd level with 1 layer, which used up 1 bucket of the Davies Sun & Rain Pale Nile paint. The swatch color of the Pale Nile showed a more greener hue but in reality it has more yellow-ish hue in it. 

The painting of the entire roof only took about a day and a half. Today was the full day of painting. They also had to remove the scaffolding to be able to completely paint the roof. Shown here are two of our workers working on the areas once covered by the scaffolding. Quite acrobatic, aren't they?

Painting on more layers all around the roof. 

Painting on the 2nd layer of paint on the patio roof portion. 

Here's the breakdown of how much we used to build the roof:
CEMENT = 120 bags
POWDERED WATERPROOFER mixed in with the cement = 120 packets
SAND = 18 cubic meters or 6 truck loads (about 1/3 were not used after sieving)
BOSTIK cementitious waterproofer= 20 buckets
PAINT = 21 buckets

We still have to paint the 12 posts which will probably use 2 buckets of paint. We had to buy our paint from 3 stores because they do not carry enough of one color in each place. The problem we found was the colors did not match although it was supposedly the same Pale Nile color. One was greener, the other was yellower. Thankfully once the paint was applied the difference was not too obvious.


Sunday, April 5, 2015

Day 61

The spraying of the shotcrete under the eaves of the patio roof is almost done. We had about 6 layers of the shotcrete, the final one using pure mix of water and cement. Then when we almost finished with the final section of the eaves, we had the idea of applying a pure cement and water mix, thick enough to be like paste and simply paste the mixture in the areas where the wire mesh is exposed. It would have saved us a lot of time if we did this in the first place. We were a bit distracted because we had a house guest and could not really keep an eye on the work being done. However, the shotcrete work took 7 days to complete the entire patio roof, but not to completely cover it. Now with that pasted on pure mix on the areas that have exposed wires. we will now just have one layer of sprayed on pure cement and water mix.

We will use this method when doing the inside portion of the roof.


We also have applied  layers of the cementitious powermix Bostik on the roof (pictured above). It was tested the same day when rains poured that night. There were no leaks inside the house nor in the inner portion of the patio roof. We plan to have at least 3 layers of Bostik on the main roof and 4 layers on the patio roof.

We anticipate painting the roof this week. We plan to use the Davies Sun and Rain Pale Nile color for the roof. Thankully we found a distributor close to our place with even a cheaper price tag than the other places in the area.

It is supposed to be (officially) summer time now. But we are blessed to have some rains at night to cool of the warm temperatures of the day. It also refills our rain water tanks which is so precious around this time of extreme drought.

Wednesday, April 1, 2015

Day 58

Work continues on the eaves and the roof edge. It is only the 6th day of the shotcrete work on the eaves, which is going pretty quickly compared to the manual throwing of concrete, the style used to cement the edging of the roof. If our mason did the throwing of concrete to finish/smoothen the eaves it would have taken even longer. The only negative side to the shotcrete work is the dust that forms after the sand dries off the cement because the mix is very wet so as to allow the mixture to be sprayed. But, the work sure goes pretty fast and we use a lot less cement and sand.

By next week we hope to continue with the waterproofing of the roof.

Monday, March 30, 2015

Day 56

Shotcreting of the eaves continues. They applied the first coat of the cementitious powermix, Bostik, after all the cracks have been sealed with Polytuf. The mason is finishing the edge of the roof. Once that is done his job will be done. The remaining workers will be the ones to finish waterproofing and painting the roof.

We had a visitor for the past 4 days so we were not able to keep an eye on the work, but, thankfully, there is continued progress every time we come home at the end of the day.


Tuesday, March 24, 2015

Day 51

The shotcrete work under the eaves continues. So far we had to repeat the process 5 times and then the 6th time we will apply pure cement shotcrete to complete cover everything. On the roof, the mason started applying polytuf to seal the tiny cracks all over before we apply the waterproofing.


Monday, March 23, 2015

Day 49

The gap between the bond beam and the roof is now sealed off. We placed slightly bigger pipes to house the conduit pipes for easy access when there is need for repairs.

More of the gap being sealed off.

Now starting the shotcrete under the eaves.

He sprays a thin layer of cement evenly, then comes back to do another layer. He will probably have to do this at least 4 or 5 times depending on when we can achieve the desired thickness of the concrete. They had to make the cement/sand mix watery so it can shoot upward easily. It is not so when we did the wall as it is simply a horizontal spraying direction. Spraying upward has resulted to a lot of sand falling off when it dries up. There's so much left over. We forgot to put tarp underneath to collect them so we had to sweep them off, which stirred up so much dust. Today we made sure that tarp is laid all over the floor for easy clean up later today.

Friday, March 20, 2015

Day 46 & 47

Our worker removing the wood from the concrete bond beam. The other one (not in the picture) removing the remaining portion of the bamboo rafter that is connected to the bond beam. 

The patio roof without all the bamboo rafters and with the concrete mini-beam.

From the other side of the house.

The underside of the patio roof has this wavy pattern which actually looks nice but these will be covered with shotcrete to protect the wire mesh from getting rusty. So it will look exactly like our outer wall except we will be painting the roof to make it waterproof.

We also have decided against putting screen around the bond beam because it will take so much time just to install it ad secure it to the bond beam. Instead we will be cementing the gap between the bond beam and the roof.

As I mentioned before, part of being our own contractor/supplier we buy our own materials. What we realized is that almost everyday we go and get supplies or materials/tools. Doing this renovation with no set procedure or way of doing things, we are simply learning and deciding as we go along. However, we will surely be more experienced when we go on to our next ferrocement project.

So far we have learned the following: 
1. The quality of materials here are not the same as in the U.S. Most of the time the locals use sub-standard materials which does make a huge difference when you are trying to do a quality job.

2. You have to do your own canvassing to find the best quality material for the best price. Prices vary from cheap to expensive for the same item. It does help to shop around.

3. Most, if not everyone, will use the same product just because it's been used for the longest time. But if you do your research, you will find a much better product for lower price. 


Wednesday, March 18, 2015

Day 45

Removed the bamboo rafters, left are 3 inch nails we used to attach the rafters to the wood beam. Without the rafters the patio roof is simply held up by itself, which is termed "flying concrete". We decided to just close the gap between the wood beam and the roof to make the connection more solid.

From a different angle, you could see the remaining 3 inch nails and the gap.

We placed 2 slats of bamboo to provide temporary backing for the cement.

This is our mini-beam on top of the wood beam. 

Work continues on the removal of the remaining bamboo rafters. It is taking a while because it is not easy to saw off these solid bamboo. Our cutter blades keep on getting blunt quite often. At least there's much progress at the end of the day.

Monday, March 16, 2015

Day 43

We were in town yesterday to get parts for our compressor so we can use it to spray the cement mix under the eaves of our patio roof. We got the connectors and adaptors but we found out later when we checked the compressor itself that the second hole is smaller than the other one. So our connectors do not fit.

Then when we surveyed the removal of the bamboo purlins, we realized that the workers removed the ones actually on top of the bamboo rafters. So there is a gap between the rafter and the roof itself. Meaning, the posts are the only ones holding up the patio roof. So to remedy this we have decided to just cut out all the rafters, since it is no longer a support for the roof. We will be shoring up the wood beam with a mini-concrete beam above it with an embedded 10mm rebar. Then we will be completely cementing the space between the roof and the bond beam. Right now the junction between the patio roof and the main roof rests on 24 mini-posts on top of the bond beam, aside from the 24 flat bars connected to the bond beam which hold up the 24 bamboo rafters of the main roof. We wanted to put screen around that gap to allow air to enter, however we think it is best to just completely cement it to provide a more solid support for the roof and the wall.

We will be applying the shotcrete, the term used for spraying cement/mortar, for under the eaves and inside the house. This will be done after the posts.mini-beam and bond beam have been shored up.

Sunday, March 15, 2015

Day 42

The work on the posts and removal of the bamboo purlins/tarp continues. The entire city here is on holiday to celebrate the 78th Araw ng Dabaw. We decided to come to the city to get some supplies but due to the holiday celebrations most of the big hardware stores are closed, except for the franchise big box stores. So we borrowed the mortar spray gun from our cousin, bought the extra hose and connectors/adaptors for our compressor from the smaller hardware stores still open today. We plan to have our worker to use the compressor to apply the cement mix to the eaves of the patio. This will be a much faster application instead of having the mason throw the mix by hand. When the mason is finished with the posts, he will then work on applying the waterproofer on the main roof to seal in the cracks before we apply the neutralizer then the outdoor paint.

While we are here in town we will get the supplies we need for the waterproofing and the painting. And maybe get some plants on sale at the mall, making a day out of it.

So to all, Happy Araw ng Dabaw!

Friday, March 13, 2015

Days 38, 39 & 40

All the mat/plastic/net have been removed.

The bamboo purlins and tarp backing removed. This still needs finishing.

One of our workers removing the cut bamboo purlins. They need to be pried off because we had nailed/stapled in the tarp backing.

Here our mason is testing a 1:1 ratio of cement/sand mix. Eventhough this mix is stickier than the usual, and even if he throws it instead of pushes it in, portions of it still fall down. Overhead cementing is one of the toughest to do, according to our mason. W will try using our air compressor and simply apply the cement using the sand blasting method, like what we did with our outer wall.